Installation Requirements
Both the JobServer.NET Service and the JobServer.NET Manager are built using Microsoft .NET Framework 4.8 and inherit a portion of the minimum system requirements based on this. Either or both can be installed on any 64-bit version of Windows 7 or later, and Windows Server 2008 R2 SP1 or later. This includes:
| Windows Server Versions | Windows (Desktop) Versions |
|---|---|
| Windows 2025 | Windows 11 |
| Windows 2022 | Windows 10 |
| Windows 2019 | Windows 8.1 |
| Windows 2016 | Windows 8 |
| Windows Server 2012 R2 | Windows 7 |
| Windows Server 2012 | |
| Windows Server 2008 R2 SP1 | |
Note: versions of Windows Server 2008 and earlier (Windows 2003, Windows 2000, etc.), are not supported due to Microsoft not supporting installation of versions of the .NET framework greater than 4.5 for these older operating systems.
Minimum available disk space requirements: 500 MB (Recommended: 1GB)
While the basic installation of the service and manager applications do not have a heavy storage requirement, the amount of actual disk space required once you start adding jobs can vary significantly based on your configuration settings. Additionally, if your machine does not have the minimum required version of Microsoft .NET Framework installed, this does not account for space that might be needed to update your installed version of the .NET Framework.
Minimum available memory requirements: 256 MB (Recommend: 1GB)
While the basic installation of the service and manager applications do not have a heavy memory requirement, the use of the various plug-ins and how you may configure them will have the potential to require more available memory to function or to extract best system performance. Jobs will require additional memory only while they are running and automatically free up resources when complete.
For machines where only the manager application will be installed, both the disk space and memory requirements are significantly reduced.
Prerequisites
Versions of Windows 10 (version 1703) and earlier, as well as Windows Server 2016 and earlier may need to have Microsoft .NET Framework installed or updated before installation can complete. For these older versions, Framework 4.8 or later will need to be installed. For newer versions of Windows and Windows Server, a compatible version of .NET Framework is already installed by default.
Download and Installation
Depending on where you received or viewed this documentation from, we we want to make it clear and obvious that to get the genuine and most recent installation package for JobServer.NET, all you need to do is go to https://jobserver.net/downloads. The installation package allows you to choose if you are installing just the Service, Manager, or other related tools. Just this one installer is needed no matter which parts of JobServer.NET you need to set up. When you run the installer, it will default to installing most of the options. If you only need Manager, then deselect all options except the Manager. Otherwise for most installations, the default options are all you need.

When the installer runs, any prerequisites that are not detected will be prompted for installation, such as minimum required Microsoft .NET Framework. Once the installer has completed, the Service will be running in the background which can be seen by viewing the Windows Services app (previously also found in Control Panel in older OS versions). It should provide you with the option to start the newly installed Manager application.
When running the Manager application, it should become apparent that JobServer.NET integrates immediately into your existing network configuration. There is not a default account or password to connect the Manager application to the Service application as due to this integration with Windows security, your login to JobServer.NET is tied to your Windows network or machine credentials. Thus, to login the first time, your available methods will depend on if your machine is running as a domain member on your network or is a standalone or workgroup machine.
For machines that are domain members, then your login credentials are your standard Active Directory network credentials for any accounts that are administrators or have had JobServer.NET based groups assigned to them. See the Authentication Options section if you prefer to use accounts that are not administrators.
For machines that are not domain members, then your login credentials are your local machine-based login credentials. This means you just use the same login and password you would use to login to an administrator account on the machine. The same JobServer.NET based groups can be defined on a local machine’s accounts if you prefer to not use the administrator account(s).

Once you successfully login for the first time on a given machine with a new installation, you will be automatically prompted to create your first job. If you have any trouble logging into the Manager application, see the online guide at https://kb.jobserver.net/Q100001 for a guided tour on diagnosing issues with connections or authentication.
The rest of this section will walk you through the basics of setting up and creating some example jobs and getting you familiar with the overall features you need to get started with using JobServer.NET.
Settings
The JobServer.NET Service operates in an invisible fashion if you do not actively have the Manager application open and are sitting and watching it. Of course, this is exactly what it should be doing most of the time. But on the occasions when something happens or a problem is detected, it can notify you or your team about any of these detected issues. It does this by sending a notification. Notifications can go to one or more team members via email and the Notification Settings option is how you configure this.
To configure email notifications, you will need the connection information for your network’s SMTP email server. The connection information options are described here to help guide you. Once you have entered the correct details, you can use the Test button on the settings form to send a test notification from JobServer.NET. Keep in mind that the test feature sends the notification email immediately, but depending on your email configuration, it might take some time for it to arrive. It is not unusual for externally hosted email services to take a couple of minutes to show new messages in your inbox.
If you have any trouble with your notification settings, see the online guide at https://kb.jobserver.net/Q100002 for a guide on configuring SMTP connections.
| Setting | Description |
|---|---|
| SMTP Server | The fully qualified URL to your email server. If you need to specify a port different from the default port, you can specify it by adding a colon and the desired port number after the URL. Examples: smtp.example.com, smtp.example.com:2525 |
| Username | If the above email server requires authentication, then the username for the account should be specified here. Note that many times these account names will look like or are the same as the sending email address, but this is not always true. Example: user@example.com |
| Password | If the email server requires authentication, then this will be the password for the account specified with the username setting. |
| Use Secure Transport | If the email server requires or allows encrypted communications, this option should be checked to turn on the encryption option. Most modern email servers support this and we highly recommend using encryption if it is available. Many mail servers are starting to require all connections to be encrypted. |
| Send As | The email address of the account that the email sent by JobServer.NET appears to come from. Some email servers may require this to be a valid email address. Otherwise, a common option here is to put a non-existent address so if someone accidentally replies to it, they will get a bounced message right away. Note: this should always just be a single email address. Examples: noreply@example.com, support@example.com |
| Deliver To | The email addresses of the accounts that should receive notification messages. If your email server supports group addresses and you have one defined for the role, then we highly recommend putting just the defined group address here. Otherwise, you can specify any number of recipients for notifications by simply separating email addresses with a comma. Examples: admin@example.com, jean@example.com, joe@example.com, itsupport@example.com |
Layout of the Manager Application
Once you are logged into the manager application, you can see that there are three main elements to the application’s layout. Below the menu bar on the manager window is the main toolbar. Most of the buttons on the main toolbar are not enabled and cannot be used until you have taken some other steps which we will get to shortly. The two buttons that are always enabled are the Connect Server button, which we will be addressing in one of the next sections. And there is the Help button which will open your default browser to the main help page for JobServer.NET.
Below the main toolbar, we see the rest of the window is split into two panels. The left-side panel is the navigation panel. The navigation panel will display our server connection(s) and hierarchical lists of jobs for each server. The right-side panel is the control area. As you perform various actions, they will open different windows in the control area. You may have multiple windows open in the control area and can switch between them as needed. In between the navigation panel and the control area, the bar can be grabbed with your pointer to resize the panels to best suit your display.

Prepare Test Folder Location
Since the following topics in this section will walk you through creating some example jobs, you will want to prepare for this by creating or picking an appropriate test folder location. Most Windows machines may have a temporary folder as C:\Temp. This should be fine for most people, but you can certainly pick any location that is more suitable. Just substitute your desired path for C:\Temp in the examples below. To start with, create a JobServer folder in C:\Temp, and then underneath the JobServer folder, create the following subfolders: Cleanup, OtherDept, and Pickup. You should wind up having the following folders:
- C:\Temp\JobServer\Cleanup
- C:\Temp\JobServer\OtherDept
- C:\Temp\JobServer\Pickup

If you need more detail than presented here to follow along with instead of the steps outlined in this section, see the guide at https://kb.jobserver.net/Q100003 for a more visual tutorial.
Creating a Schedule Based Job Definition
Once you have completed your notification settings, we can try setting up a sample schedule-based job definition. Schedule based jobs mean that you are going to run a job definition one or more times on some determinable date and time based pattern. This is done by using a Scheduler trigger and is one of the most used methods for starting jobs. When you need to pick up files from some location on your network, run and deliver some type of report, or perform updates of data in a database, the scheduler is a reliable building block to make these types of processes happen.
To start with creating an example scheduler, look at the manager application. In the navigation panel, it shows you the JobServer.NET machine(s) for which you are connected to. Under each server you can be connected to, you can see a view of the job definitions that are defined on each server. For a new installation, you will just see your connected JobServer.NET machine and no job definitions listed below it.

When you right click on your connected server, you will see a pop-up menu list of options for your server. Select the New Job option from the menu and in the control area will show a new empty job definition form. For the Name field, enter “Cleanup Old Temp Files”. Then from the Trigger field a few lines down, select the Scheduler option from the drop-down list.

Once you do, you will see a new dialog open with the options for the scheduler trigger. The first step of course is the only visible option so far, picking a Recurring option. Start off by picking the Once a day option, as the other options are covered in more detail later. The Start Date will default to the current date, so we just want to pick a time of day you want to cleanup some old files. Since JobServer.NET displays times in 24-hour format, pick a time suitable for you. We might recommend entering 23:00 so this job will run an hour before midnight each day. Click the Save button when you are ready.

At this point we have started defining this job and when we want it to run. Now we need to tell it what we want it to do. In the bottom section of the job definition, you want to locate and click on the button titled New Step. This will open the new job step dialog. The first field here is the Module field, click here to see the list of installed modules and locate the one called [Files] Find and click on it. This module is used to search for any number of eligible files that meet all the search criteria you might need.

When that has been selected, you should now see the Files Find module has loaded and is now showing all the configuration parameters available. Before we just to that, update the Name field by entering “Find Old Temp Files” into it. Then locate the first parameter called File Source and add a path to a folder on your JobServer.NET machine that contains some old files you no longer want to keep around. For testing, we will use one of the test folders we created above. So, for this example we are putting the folder path of “C:\Temp\JobServer\Cleanup” into the File source parameter. Next, we change the Age threshold type parameter to a value of Older. Then we set Age threshold value to 90. And finally set Age threshold units to Days.

This combination of options tells the Files-Find module that we want to find all files in this folder that are older than 90 days old. So, this step is selecting all the files that we are about to do something within the next step. We can now finish this step by clicking the Save button and returning to the main job definition.

We now have a job definition with a single step defined which retrieves a list of files. Next we want to do something with that list of files. We do this by adding another step after the first one by again clicking the New Step button. This time when we get the new job step dialog, we want to select the [Files] Delete module. Update the Name field by entering “Delete Old Files” into it. The File source parameter listed here just needs to be connected to the list of files that the previous step has found for us. To do that, select the Assign button on the line for the File source parameter. This is the button that looks like an equal sign. Once you do that, you will see the assignment dialog with a list of all the possible variable and parameter options. You want to locate the one from the FindFiles module in Step 1 with the output parameter of FileList. The FileList parameter name is used by [Files] Find and some other modules to output a list of files that the module has worked on or found in this example.

You can select the FileList output from the [Files] Find module and click the Select button. This now connects the output of [Files] Find to the FileSource input for this module in this step. When a parameter’s value is assigned, you should notice that the value part of the control now changes from an input box to a display showing the linked parameter. When you are ready, you can click the Save button to complete the [Files] Delete step.

Now that you have created this second step, it takes all the files found from the first step and deletes them. This is a good example of how you can clean up folders of old log files and other outdated files you may no longer want to keep around.

Once you click the Save button as the top of the job definition, you will see the job is added to the navigation panel under the server and the job is now active. It will clean up any of the older files it finds in the folder you specified at its scheduled time every day.

Running Ad-Hoc Jobs and Monitoring
You now have your first job ready to run. To try it out be sure to add some files to the folder you specified when you created job step 1 in the above exercise. Make sure some are files older than your age setting (older than 90 days if you followed the example exactly). And be sure to include files that are newer. But once you have done that, you do not want to wait until late at night to see what happens when the job is executed. We will see how you do that in just a moment. First, you want to locate the Monitor button on the toolbar of the Manager application and click it. This opens the monitor which shows you what jobs are queued and executing on JobServer.NET right now.

Now this next part will happen quickly, so you want to pay close attention to the monitor after this next step. You can start your job at any time (ad-hoc) and as soon as it starts, it will show up in the monitor and you will be able to see it run and finish. When you are ready to start your job, you want to right-click on your job name in the navigation panel and from the pop-up menu, pick the Start option. Your job will run right away when you click the start option.

Some job definitions, such as the one highlighted in these example screenshots, execute their job steps very quickly and you will have to watch carefully to see them display a running status. Most job definitions perform quite a bit more work and it would be easy to catch them in the running status.

After the job has finished running you will see it continues to display in the monitor for a few minutes afterwards. This is so you have a chance to view the very recently completed jobs in the monitor. Now review the files in your folder and you should be able to confirm that any files you placed there over the specified age have been successfully deleted.

Creating an Event Based Job Definition
After looking at the scheduler trigger, the other triggers have something in common. They are all event-based triggers, which means they all trigger when something external to JobServer.NET occurs and the trigger detects this change. Thus, some external event causes these types of triggers to have a job start executing.
One of the most popular of the event-based triggers is the FileWatcher trigger. This trigger can watch for file activity in a specified folder and respond to file changes in it. This can be very handy for numerous situations. Maybe you want to take files that are dropped into a folder and automatically compress them into a ZIP file. Or, perhaps you have some legacy system that can generate a bunch of files in a folder, but you need a way to email them out automatically to a supplier or vendor for processing.
To start with creating an example FileWatcher, create a new job definition by right clicking your server and selecting New Job. When the new job form appears, change the Name to “Copy Files to Other Department”. Then go to the Trigger field and select FileWatcher. When the parameters dialog for FileWatcher appears, go to the Folder path to watch setting and add the value “C:\Temp\JobServer\Pickup”. Then in the Trigger actions field, select the All option. You can now click the Save button to finish creating the trigger.

Next create a step for this job by clicking the New Step button. In the Module field, select the [Files] Copy Move module. In the Name field, change the text to “Copy files from pickup to other dept”. Then in the parameters, we want to specify the File source as the example folder “C:\Temp\JobServer\Pickup”. Then select the Copy option for the Copy or Move parameter. And finally, you want to specify the Destination folder as “C:\Temp\JobServer\OtherDept” before you click the Save button to complete the settings for this step.

And finally, click the Save button on the job definition to create the new job. Once you do this, the job is now active and any files you place into the Pickup folder you created, will be immediately be copied to the OtherDept folder. This functionality works with files on local storage, or on network paths. The only requirement is that the JobServer.NET service must have permissions to the filesystem the files and folders are stored on.

Now with the job defined and enabled, you can test out this event based job definition by putting some files into the folder it is watching, the source folder or Pickup folder as we have named it in the example steps above. Then we watch as the job gets triggered and executes by copying the files we send it to the configured target folder, named OtherDept in the example steps above. This will happen pretty fast, so you will have to pay close attention to see it happen. To try it, we arranged a few file explorer windows to make it easy to view all of them at once. The one on the bottom contains a few example files we are going to drag into the Pickup folder.
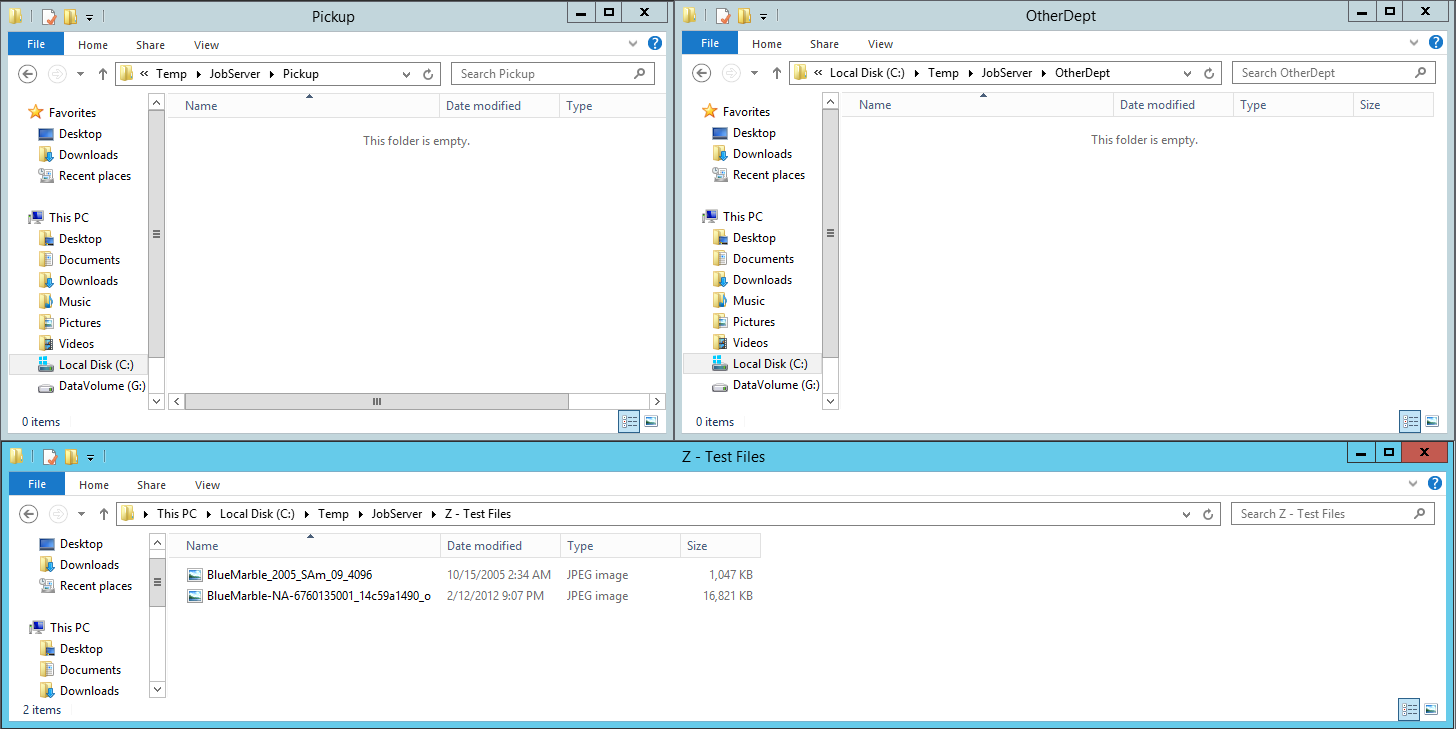
To test the newly configured job definition, you want to copy some files into the source folder you configured above. To do this, copy some files from another location and paste them into the “Pickup” folder that you defined as the source folder.

After the job executes, you see the files dropped into the source folder (Pickup) are automatically detected by the JobServer with the FileWatcher trigger and they are copied to the target folder (OtherDept).

Viewing Log History for Jobs
If you have followed through the steps above, you should now have some activity that JobServer.NET has performed recorded in the logs. You can now review this log activity to see what happened when these triggers launched the jobs and see their results. While the Log button on the main toolbar of the manager application allows you to see the entire log at once and filter down to any interesting data, there are other ways to quickly drill down to the relevant data you might want to see.
The best option for reviewing specific jobs is to right-click on the job in the navigation panel and pick the View History option.

Selecting this will open the Job History grid which shows all the times in which he job has been run.

By double-clicking on any of the entries in the job history, you will be taken directly to a filtered list of just the log activity for that specific run of the job. This allows you to quickly drill down on a job’s activity and monitor what the job has done or to research any problems that might be recorded.
